

The Lost Art of Fill-In Flash
In a world obsessed with natural light and bokeh, the humble flashgun has become something of a forgotten hero. But when used properly, fill-in flash can elevate your photos from “nice” to “nailed it.”

Let’s be clear—we’re not talking about harsh, full-power bursts that flatten a subject like a deer in headlights. Fill-in flash is the art of balancing light. It’s about adding just enough pop to lift shadows, sharpen edges, and restore detail without shouting about it. You can use your built-in on-camera flash if it has one or if your camera has a hotshoe you can use an accessory flash, sometimes called a 'flash gun' or a 'speedlite'.
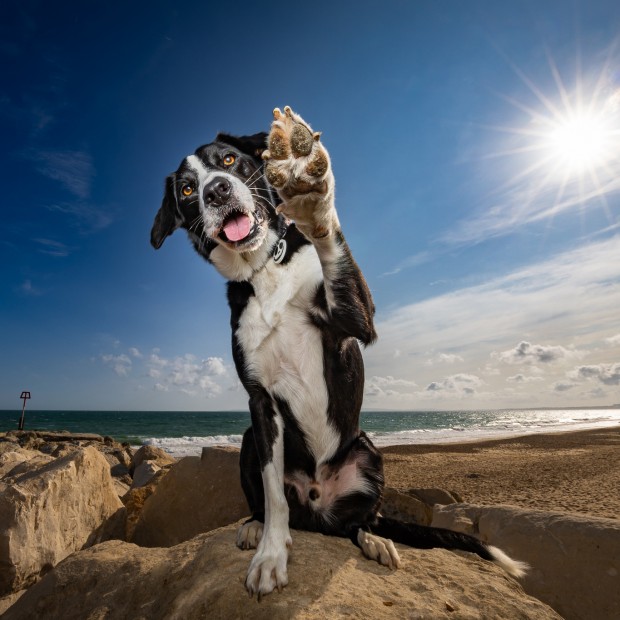
A master of this art is local photographer, Dan from A Billion Clicks Photography who has made Dog Portraits his specialism, check out his Instagram for more examples of this awesome style of photography. We asked him how he went about creating the following Dog Portrait :
 Dan from A Billion Clicks Photography – "I used a Canon 11-24mm at 11mm and exposed for the scene, not the subject. This was at the max flash sync speed for my camera which was 1/200th and an aperture of f18 to get the sunstar. In doing so though the subject (his name is Rory and he is a friend's dog) was just a silhouette.I hand hold a Canon R3 and lens in my right hand and the flash/soft box in my left hand placed directly on top of the camera. I used a Godox ad200 in a soft box right on top of the camera to then light Rory."
So, when should you use fill-in flash?

Think sunny days, strong backlighting, portraits under trees, or any time your subject is half in shadow. That bright summer sun you love? It often casts deep shadows under eyes and hats. A gentle flash set to -1 or -2 EV can smooth all that out beautifully, giving you cleaner, more professional-looking shots.
-
Midday Sun Portraits: The harsh overhead sun often casts dramatic shadows—deep eye sockets, dark lines around the nose and chin. A gentle flash set to –1 or –2 EV adds flattering light without washing out the scene.
-
Backlit Scenarios: Shooting against the light? A quick burst fills the silhouette, restoring detail and making your subject pop.
-
Under Tree Canopies: Dappled shade looks pretty—but skin tones can suffer. Fill flash evened things out and keeps the mood.
-
Indoor Daylight: Near windows? A fill-flash balances bright highlights with softer ambient light without needing high ISO.
Modern gear makes it easy

Nearly all mirrorless and DSLR cameras support TTL (Through The Lens) metering, and many flashguns let you dial exposure compensation in seconds. Add wireless triggers or compact off-camera units and you've got even more control without lugging a studio’s worth of gear.
- TTL Flash: TTL (Through-The-Lens) metering automatically adjusts output—so your flash balance feels natural and subtle. Want more control? Dial in Flash Exposure Compensation (FEC) to fine-tune the effect (-1 to -2 EV for fill-in).
- Off-Camera & Wireless Control: Even a basic wireless trigger lets you position the flash off-camera. Try angling it slightly higher or 45° for a subtle, directional effect—this adds dimension without looking staged.
- Continuous LED Modeling Lights: Some flash units include LED modeling lamps. They show you exactly where the light will fall, so you can preview and adjust before snapping.
Don't forget the built-in options

Even a built-in pop-up flash can be useful if you dial it down and diffuse it. It's not about power—it's about finesse. Your camera’s built-in pop-up flash can deliver surprisingly nice results—once you learn to dial it down (-1 to -2 EV) and soften the light:
-
Bounce diffusion: Use a small bounce card or folded paper to scatter light.
-
DIY diffuser: Stretch a thin white glove or diffuser disc over the flash to eliminate harsh hotspots.
Final tip: balance is everything

Use flash to fill, not dominate. Let ambient light do the heavy lifting, and use your flash to polish the edges. You’ll retain atmosphere and still get detail in the shadows.
-
Lighting ratios matter: Let ambient light remain dominant—your flash is just supporting.
-
Shutter speed + sync: Stick with your camera’s maximum flash sync (often ~1/200s or 1/250s); you can also venture into high-speed sync (HSS) for wide apertures in bright light.
-
White balance: Use “Flash” or set manually to avoid cool or warm mismatches.
At Castle Cameras, we stock a wide range of flashguns and light modifiers—from compact on-camera units to wireless kits ideal for travel or events. Pop into one of our stores or browse online to find the right flash for your setup. And if you’re unsure where to start, we’re always happy to help.
Let’s bring flash back—subtly, smartly, and stylishly.
-
-
Posted by Graham Fry
10th July 2025