

Getting Started with Printing Your Photographs with Canon Printers and Fotospeed Papers.
There’s something undeniably special about physically holding a photograph you’ve shot in your hands. Whether you're printing for exhibition, sale, or personal satisfaction, producing your own prints is one of the most rewarding parts of photography and completes the full process of capture to output.
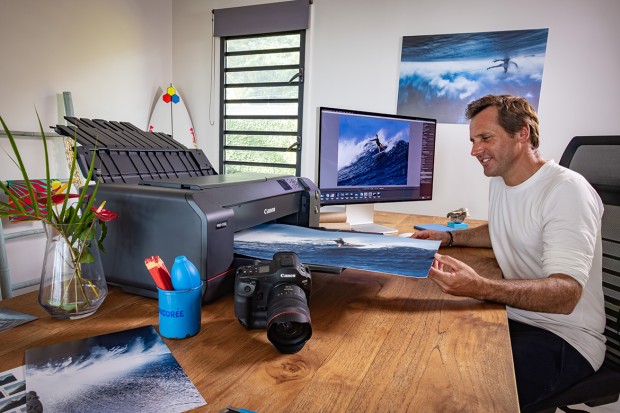
Canon’s PRO-310 (A3+) and PRO-1100 (A2+) professional inkjet printers are designed with photographers in mind—offering superb colour accuracy, deep blacks, and the flexibility to print everything from crisp landscapes to fine art portraits. In this guide, we’ll show you how to get started with either printer, plus why Fotospeed inkjet papers are our top recommendation for the job.
Step 1: Set Up Your Canon PRO Printer

The Canon imagePROGRAF PRO-310 and PRO-1100 are built for photographers who want gallery-quality prints at home or in the studio. Both are pigment ink-based systems rather than a simple dye-based ink, which offer superior colour, resolution and longevity of the final print.
- PRO-310: An A3+ printer using a 10-colour LUCIA PRO ink system. Ideal for high-quality prints up to 13” x 19”.
- PRO-1100: A professional A2+ printer featuring a 12-ink LUCIA PRO system, delivering even greater tonal range and subtle colour control up to 17” wide and 3.2m long!
To get started:
- Unpack the printer and install the ink tanks and printhead.
- Connect the printer via USB, Ethernet, or Wi-Fi.
- Download Canon’s Professional Print & Layout software for colour-managed, full-resolution printing.
Step 2: Calibrate Your Monitor
Whilst not strictly necessary to get a successful print, monitor calibration is essential for fully colour-accurate prints. Without it, what you see on screen may not match what appears on paper. A hardware calibrator (like those from Datacolor or X-Rite Calibrite) ensures you're working from a reliable baseline.
You’ll save time, ink, and paper by avoiding trial-and-error edits.
Step 3: Choose Your Paper – Why Fotospeed?
Paper has a massive influence on the final look of your image—tone, texture, sharpness, and even mood. We recommend Fotospeed papers because they work brilliantly with Canon’s pigment-based inks and come in a wide variety of finishes to suit different photographic styles.

Fotospeed also offer a superb FREE comprehensive ebook that covers the print process from start to finish. We highly recommend you download a copy, as it is very useful to refer to.
Top picks:
- PF Lustre 275: Popular all-rounder with semi-gloss finish and rich contrast.
- Platinum Baryta 300: Exhibition-grade paper with a traditional darkroom feel.
- Signature NST Bright White 315: A matte paper ideal for fine art and portraiture, with a natural tone and elegant texture.
Fotospeed also provides free generic ICC profiles for Canon printers to ensure precise colour reproduction.
Step 4: Install the Correct ICC Profiles
ICC profiles are vital for colour accuracy. They tell your printer how to handle colour on specific papers. Fotospeed have generic profiles for all of their papers on their website, they also offer FREE custom profiles to ensure you are getting the best out of your printer and paper.

Here’s how to use them:
- Download the correct profile for your printer and Fotospeed paper from Fotospeed’s ICC library.
- Install it (macOS: Library > ColorSync > Profiles, Windows: Right-click > Install).
- Use the profile in Canon’s Professional Print & Layout or your editing software when you print.
Step 5: Prepare Your Image for Print
Before printing:
- Resize your image to print size at 300ppi.
- Use soft proofing to simulate how the print will look on the chosen paper.
- Apply output sharpening to compensate for ink spread—especially important on matte papers.
These small steps can make a big difference in the final print.
Step 6: Print with Canon Professional Print & Layout
Canon Professional Print & Layout (PPL) is free software that integrates with Lightroom and Photoshop or runs standalone. It gives you fine control over layout, profiles, and colour management.
When printing:
- Select your paper type, ICC profile, and set colour handling to 'Application Managed'.
- Choose print quality (we suggest High or Highest for final prints).
- Use borderless or bordered options depending on your presentation needs.
Step 7: Finishing Touches
Once printed, allow your print to dry for 10–20 minutes before handling or framing. Pigment ink is water-resistant once dry, but it’s still best to handle prints carefully—ideally with cotton gloves to avoid marks.
For archival presentation, mount your prints behind UV glass or store them in acid-free sleeves or boxes.
Final Thoughts
Whether you’re printing with the compact Canon PRO-310 or the larger PRO-1100, you’ll gain full creative control over your images—from screen to final print. Paired with Fotospeed’s excellent range of papers, you can achieve gallery-quality results at home, with colour fidelity, texture, and depth that make your work truly stand out.
Need help getting started? Visit us at Castle Cameras, give us a call, or browse our selection of Canon printers and Fotospeed paper online. We’re always happy to talk print.
-
Posted by Graham Fry
18th July 2025